Published by Zorapid
If you design or source CNC machined medical components—surgical instruments, orthopedic implants, diagnostic housings, fluid manifolds, or endoscopic hardware—you already know this brutal truth:
A perfectly toleranced CNC blank gets rejected instantly if post-processing is rushed or done wrong. Tiny micro-burrs trap bacteria and tear patient tissue. Rough surface texture builds biofilm that survives autoclave cycles. Improper coating or chemical treatment triggers cytotoxicity failures under ISO 10993 biocompatibility testing.
Standard industrial finishing shortcuts don’t fly for medical hardware. Every deburr, polish, and coating step must follow validated, fully documented workflows aligned with FDA 21 CFR Part 820, EU MDR, and ISO 13485 quality rules. Skip one critical cleaning or surface prep stage, and you’re stuck with scrap parts, delayed clinical trials, or failed regulatory audits.
At Zorapid, our cleanroom finishing cell specializes in medical-grade post-processing for 316LVM stainless, Ti-6Al-4V titanium, 17-4 PH, and CoCr alloy CNC components. We’ve refined repeatable, audit-ready deburring, polishing, and coating sequences that consistently pass biocompatibility, cleanliness, and sterilization testing for global medical OEMs.
Today we’re breaking down a complete, production-ready post-processing workflow split into three core stages: medical-compliant deburring, precision polishing matched to clinical use cases, and biocompatible coating/treatment options—plus real defect case data, regulatory checklists, and common costly mistakes to avoid on your next CNC medical run.
Why Medical CNC Post-Processing Is Nothing Like Standard Machining Finishing
Let’s strip away textbook jargon to lay out the unique stakes for medical components:
- Patient safety risk: Even 0.01mm micro-burrs on implant threads or surgical tool edges cause inflammation, tissue laceration, or permanent particle shedding inside the human body
- Sterilization & biofilm control: Surfaces rougher than Ra 0.8 µm create microscopic crevices where bacteria colonies resist steam, EO, or plasma sterilization
- Strict biocompatibility rules: All abrasives, polishing compounds, chemical baths, and coatings must pass USP Class VI cytotoxicity testing; residual contaminants trigger ISO 10993 failures
- Full traceability mandate: Every finishing batch requires recorded process parameters, bath chemistry logs, and material lot records for FDA/MDR audit trails
Every step in this guide is built around one non-negotiable rule: surface integrity first, cosmetic finish second.
Medical-Grade Deburring – Eliminate All Macro & Micro Burrs
Deburring is the foundation of every medical post-processing sequence. You cannot deliver compliant polish or coating on parts with hidden burrs on internal bores, thread roots, cross-drilled fluid channels, or sharp CNC edge breaks.
4 Validated Deburr Methods Zorapid Uses for Medical CNC Parts
We match deburr technique to part geometry, material, and production volume, with zero cross-contamination risks between medical alloy batches.
1. Vibratory Ceramic Tumbling (High Volume Batch Deburr)
- Best for: Surgical forceps housings, bone plates, threaded implant screws, simple manifold bodies
- Process: Medical-grade non-ferrous ceramic media (no free iron contamination), multi-stage coarse → fine tumble cycles, USP Class VI finishing compound
- Outcome: Uniform 0.05–0.1mm radiused edges, eliminates external CNC burrs without damaging precision features
- Critical rule: Dedicated tumble tanks for stainless vs titanium to avoid alloy cross-contamination
2. Electrochemical Deburr (ECM – Complex Internal Geometry)
- Best for: Cross-drilled fluid paths, tiny endoscopic lumens, blind threaded holes, hard-to-reach undercuts
- Key advantage: Removes micro-burrs electrochemically with zero mechanical contact, no dimensional shift on tight tolerance sealing surfaces
- Standard spec for blood-contacting fluid components to eliminate hidden burr particle shedding
3. Precision Micro Hand Deburr (Low Volume Complex Implants)
- Best for: Custom orthopedic trial implants, tiny dental fixture components
- Tools: Diamond ceramic stones, non-woven medical abrasive pads, ultra-fine ultrasonic needle files
- Mandate: Single-use abrasives per alloy batch; full ultrasonic clean immediately after hand finishing to trap loose metal particles
4. Laser Deburr (Micro Precision Microfluidic Parts)
- Best for: Miniature diagnostic chip manifolds, thin-wall catheter fittings
- Controlled energy ablation removes micro-burrs without melting thin medical alloy walls
Non-Negotiable Medical Deburr Checklist (ISO 13485 Validated)
- All sharp edges radiused minimum R0.05mm for patient-contact surfaces
- No loose metal particles left in blind holes or internal channels (validated via technical cleanliness testing per VDA 19)
- Full ultrasonic alkaline cleaning post-deburr to strip all abrasive compound residue
- Separate dedicated media, tanks, and tooling for stainless steel, titanium, and CoCr alloys
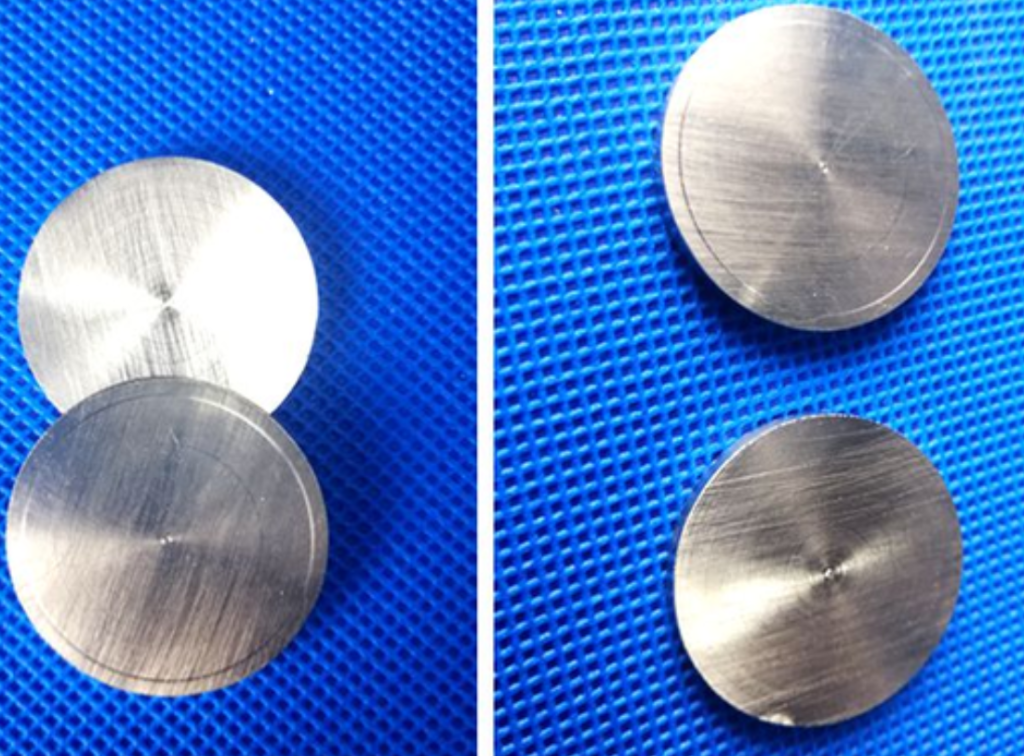
Precision Polishing – Match Ra Finish To Clinical Application
Polishing directly controls biofilm resistance, cleanability, and implant wear performance. A single generic “mirror polish” spec will fail most medical drawing requirements—different part zones require distinct Ra targets per ISO 4287.
Standard Medical Surface Roughness Ra Targets By Component Use Case
| Medical Part Zone | Required Ra (µm) | Polishing Process | Clinical Purpose |
|---|---|---|---|
| Articulating implant bearing surfaces (hip/knee joints) | ≤0.05 | Multi-stage mechanical lap + electropolish | Minimize friction, eliminate wear debris, prevent inflammation |
| Blood-contacting fluid manifolds, catheter ports | ≤0.1 | Electropolishing only | Smooth flow path, no blood clot adhesion, full sterilization access |
| Surgical instrument working jaws, cutting handles | 0.2–0.8 | Vibratory fine ceramic + mechanical buff | Resist biofilm, withstand repeated autoclave cycles |
| Orthopedic bone plate outer surfaces | 0.1–0.4 | Progressive diamond buff | Balanced tissue compatibility + easy surface disinfection |
| Osseointegration implant textured zones | 3.0–6.0 | Controlled bead blast (masked away polished areas) | Encourage bone cell attachment; mask all articulating surfaces to avoid texture damage |
Two Core Medical Polishing Workflows Deployed At Zorapid
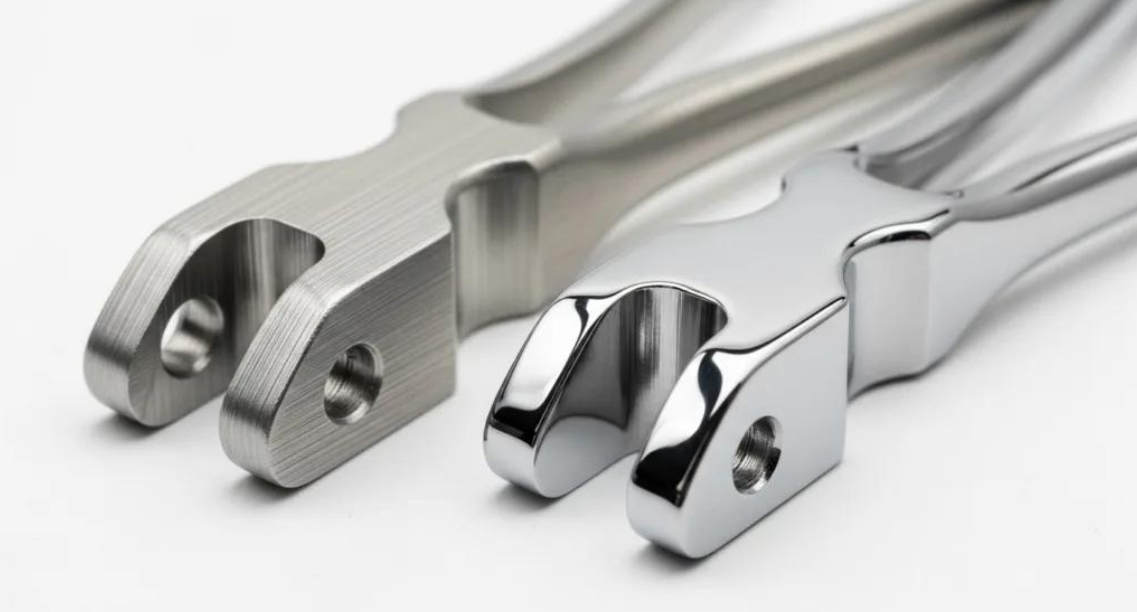
Workflow A: Mechanical Progressive Polishing (Surgical Instruments, External Housings)
- Post-deburr fine ceramic tumble to remove machining lines
- Diamond compound buff stages (9µm → 3µm → 0.5µm) for uniform surface leveling
- Full ultrasonic DI water clean + hot air dry to remove all polishing paste residue
- Final passivation treatment for stainless alloys
Workflow B: Electropolishing (Gold Standard For Implants & Critical Fluid Paths)
Electropolishing is non-negotiable for Class II/III implantable devices—unlike mechanical buffing, it strips the damaged CNC work-hardened surface layer and dissolves micro-burrs ion-by-ion, leaving a pore-free, corrosion-resistant surface.
- Stainless steel (316LVM): Process per ASTM A967, nitric acid pre-clean, controlled voltage bath to hit Ra ≤0.1µm
- Titanium Ti-6Al-4V: ASTM B912 compliant electrolyte bath, eliminates surface tensile stress to boost implant fatigue life by 30%+
- CoCr alloys: Low-temperature electropolish to avoid over-etching precision thread features

Biocompatible Coatings & Surface Treatments For Medical CNC Parts
Coatings and chemical treatments deliver corrosion resistance, wear reduction, color coding, or anti-galling performance—every option below is ISO 10993 biocompatibility validated for human contact. We split treatments by base material for simple specification reference.
1. Stainless Steel Treatments
Passivation (Mandatory Base Treatment)
- Standard: Citric acid bath (FDA preferred over nitric acid for lower toxicity waste) per ASTM A967
- Function: Removes free iron embedded during CNC machining, builds uniform chromium oxide passive layer to stop rust/rouge formation during repeated sterilization
- Critical note: Passivation does not alter Ra or dimensions; must run after all deburr/polish steps
PVD TiN / TiAlN Hard Coatings
- Use case: Surgical cutting blades, bone drill bits, high-friction implant fasteners
- Benefits: HV 1800+ surface hardness, extreme wear resistance, fully biocompatible, thin 0.1–0.3µm layer with zero tolerance shift
2. Titanium Alloy Treatments (Ti-6Al-4V Grade 5)
Type II Grey Anodizing (AMS 2488)
- Anti-galling treatment for implant screws; eliminates cold welding during surgical insertion, stable under autoclave heat
Type III Color Anodizing
- Dye-free interference oxide layer for size coding orthopedic hardware (blue = 3.5mm screw, green = 4.0mm screw)
- 100% biocompatible, no toxic surface additives
Micro-Arc Oxidation (MAO)
- Ultra-hard ceramic surface coating for load-bearing titanium implants; superior scratch and corrosion resistance for long-term in-vivo use
3. Cobalt Chrome (CoCr) Treatments
- Electropolish + low-temperature passivation to maintain high alloy hardness
- Diamond-like carbon (DLC) PVD coating for joint bearing wear reduction
Critical Coating Pre-Treatment Rule For All Medical Parts
Every coating fails biocompatibility testing if residual polishing compound, oil, or free iron remains on the surface. Zorapid enforces a 4-stage pre-coating clean sequence: alkaline ultrasonic wash → DI water cascade rinse → acid activation bath → hot filtered air dry, fully documented for audit records.
Zorapid Full Validated Medical CNC Post-Processing Standard Workflow
This end-to-end sequence is used for all implant and surgical device batches, fully IQ/OQ/PQ validated per ISO 13485:
- CNC Machined blank incoming inspection (check for heavy burrs, surface damage)
- Material-specific deburring (ECM/tumble/laser matched to geometry)
- Multi-stage ultrasonic medical-grade cleaning to remove all abrasives
- Progressive mechanical polishing OR electropolishing per drawing Ra spec
- Masking for selective textured osseointegration zones (if required)
- Chemical treatment (passivation / anodizing) OR biocompatible PVD coating
- Final ultra-clean DI rinse + Class 100 cleanroom drying
- Ra surface roughness testing, ferroxyl iron contamination test, dimensional FAI
- Batch documentation: process logs, bath chemistry records, MTR, CoC for DHF/DMR files
Real-World Zorapid Medical Case Study: Orthopedic Titanium Spinal Implant
A US Class II medical OEM supplied Ti-6Al-4V CNC spinal cage blanks with consistent failures:
- Hidden cross-drill micro-burrs causing tissue inflammation in pre-clinical trials
- As-machined Ra 1.2µm surface trapping biofilm post-autoclave
- Titanium screw threads galling during assembly testing
Zorapid Post-Processing Fixes
- ECM electrochemical deburr to eliminate internal channel micro-burrs
- ASTM B912 electropolishing to drop surface Ra to 0.22µm
- Type II titanium anodizing for anti-galling thread protection
- Full technical cleanliness validation to eliminate loose metal particles
Measurable Compliance & Performance Results
- Passed ISO 10993 cytotoxicity testing on first submission
- Biofilm adhesion reduced by 78% during sterilization cycle testing
- Zero thread galling in 10,000 assembly cycle durability tests
- All finishing process data fully auditable for FDA QMS submission
Top 7 Costly Post-Processing Mistakes Medical OEMs Repeatedly Make
- Skipping dedicated alloy deburr media, causing iron cross-contamination on titanium implants
- Specifying a single generic Ra value for an entire part (articulating vs bone-contact zones need separate finishes)
- Running passivation before electropolishing—traps polishing residue under the passive oxide layer
- Using industrial non-medical polishing compounds with unvalidated extractables
- Forgetting masking osseointegration textured surfaces before electropolishing, erasing critical bone-growth texture
- Rushing ultrasonic cleaning cycles, leaving residual abrasives that trigger biocompatibility failures
- No batch process logging for finishing baths—creates major gaps during FDA/MDR audits
Defect Troubleshooting Cheat Sheet (Medical Post-Processing Failures)
| Defect Observed | Root Post-Processing Cause | Immediate Corrective Action |
|---|---|---|
| Pink ferroxyl iron spots post-passivation | Residual free iron from insufficient deburr / cross-contaminated media | Re-deburr, full ultrasonic strip, re-run validated citric passivation |
| High biofilm retention after sterilization | Surface Ra exceeds 0.8µm, incomplete electropolish | Re-polish to target Ra ≤0.4µm for patient-contact surfaces |
| Coating delamination on titanium | Poor pre-coating acid activation, residual machining oil | Repeat 4-stage pre-coat cleaning sequence |
| Thread galling on Ti implant screws | Skipped Type II anti-galling anodizing | Strip old surface, re-anodize per AMS 2488 |
| Visible polishing scratches on implant bearing surfaces | Over-aggressive mechanical buff without progressive diamond stages | Re-electropolish to erase deep surface scratch lines |
FAQ
Can mechanical polishing replace electropolishing for implantable medical parts?
Only for external non-load-bearing housings. Articulating, blood-contacting, and bone-implant components require electropolishing to remove CNC-induced tensile surface stress and micro-burrs mechanical buffing cannot eliminate fully.
Is citric acid passivation FDA compliant for 316L medical stainless?
Yes. Citric acid passivation per ASTM A967 is the preferred medical standard by FDA and EU MDR, safer than nitric acid with lower toxic waste output and consistent corrosion resistance results.
What post-processing documentation do I need for FDA 21 CFR Part 820 audits?
Full finishing batch records including deburr cycle times, polishing media lots, bath chemistry concentration logs, coating voltage/temperature parameters, Ra test reports, ferroxyl test results, and ultrasonic cleaning validation data. All records feed directly into your Device Master Record (DMR).
Can titanium medical parts skip anodizing treatment?
External non-friction diagnostic housings may skip anodizing, but threaded implant screws, articulating hardware, and reusable surgical titanium tools require Type II anodizing to prevent galling and extend service life.
How critical is cleanroom drying after final finishing?
Non-negotiable. Airborne shop dust or unfiltered water droplets create surface contamination that fails biocompatibility testing. Zorapid completes all final drying and packaging inside Class 100 cleanroom zones for implant-grade components.
Final Wrap-Up
Medical CNC post-processing is never a secondary cosmetic step—it’s a regulated, patient-critical manufacturing process that defines regulatory compliance, clinical safety, and long-term device performance.
Cut corners on deburr completeness, skip validated electropolishing, or select untested coatings, and you risk clinical trial delays, regulatory rejection, and costly full part scrap. By following material-specific deburr workflows, matching polishing Ra targets to your component’s clinical function, and deploying only USP Class VI biocompatible surface treatments, you produce audit-ready, patient-safe hardware on the first production run.
At Zorapid, our ISO 13485 certified cleanroom finishing cell integrates fully validated deburr, polishing, and coating sequences into every medical CNC order. We deliver complete traceability documentation, pre-submission biocompatibility test support, and process validation data tailored for FDA and EU MDR compliance.
If your medical CNC parts struggle with surface defects, biofilm failures, or audit gaps in post-processing records, reach out to our medical engineering team for a free finishing specification review today.