Publisher: Zorapid.Ltd
Working with thin-gauge sheet metal (0.5mm to 2mm)?
Spot welds spit molten metal everywhere. TIG seams blow full holes mid-weld.
Your flat blank warps into a curved panel the second it cools down.
You scrap dozens of stainless steel or aluminum sheets, burn through raw material, and miss delivery deadlines.
Thin sheet welding leaves almost zero room for heat or parameter errors.
At Zorapid, we run spot & TIG welding for automotive lightweight frames, medical housings, and semiconductor sheet metal enclosures every single day.
We have fixed every common thin-sheet welding defect for hundreds of North American and EU clients.
Today we break down each failure, root cause, and actionable shop-floor fixes. No empty theory. Every method is tested on our production line.
6 Spot Welding Defects on Thin Sheet & Step-by-Step Corrections
Thin sheets cannot handle heavy current or excessive clamping pressure. Most spot weld failures come from overheating, dirty surfaces, or worn electrode tips.
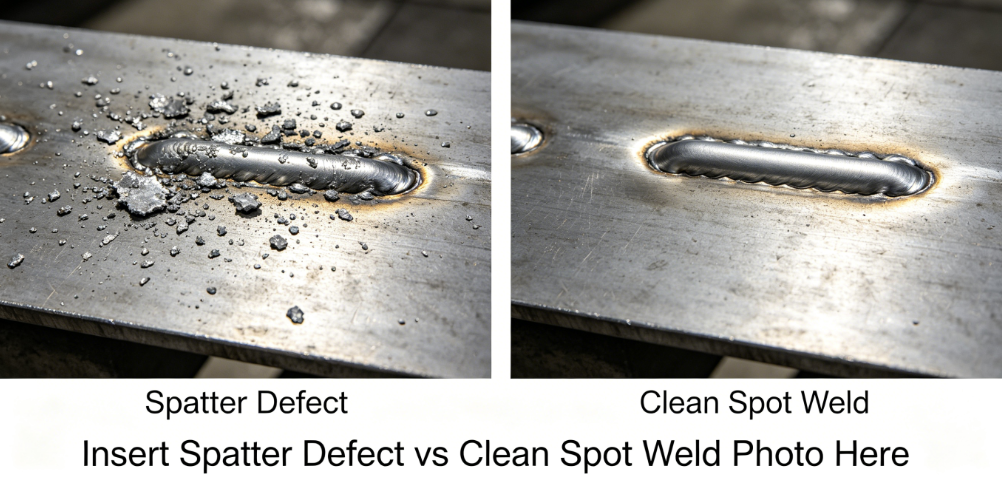
1. Expulsion – Molten Metal Spitting Out (Most Common Issue)
What you see
Bright sparks shooting out from the lap joint, deep indentations on both sides, and cavities left inside the weld nugget. The joint loses tensile strength immediately.
Root cause
Too much welding current + insufficient electrode clamping force. The molten nugget gets squeezed out before solidification. Gaps between two sheet layers make this problem far worse.
Bad habit: Cranking up current to guarantee fusion without boosting pressure.
Zorapid Fix
- Tighten sheet fit-up first. Eliminate gaps bigger than 0.05mm before clamping.
- Raise electrode forging pressure slightly, then lower weld current by 15–20%. Contain the molten metal instead of blasting heat.
- Use stepped current: short pre-pulse → main welding pulse → hold pressure while the nugget cools. No sudden energy burst.
- Dress electrode tips flat. Sharp small tips concentrate heat and trigger spatter on thin material.
2. Porosity & Internal Voids in Weld Nuggets
What you see
Pinholes inside the spot joint, invisible until peel testing or NDT inspection. Galvanized steel sheets suffer this most often.
Root cause
Oil, grease, zinc coating vapor gets trapped inside the nugget during rapid cooling. Contaminated faying surfaces between two sheets are the No.1 trigger.
Practical Improvement
- Wipe both contact surfaces with acetone, then wire-brush before stacking sheets. Remove all stamping oil and zinc residue.
- Add a short pre-heat pulse to let coating gas escape before forming the nugget.
- Extend hold time. Keep electrodes clamped tight until the metal fully solidifies to close shrinkage voids.
3. Incomplete Nugget – Weak Cold Spot Welds
What you see
The spot looks fine on the surface, but it pulls apart easily under small tension. No full fusion between upper and lower sheet.
Root cause
Low current, too short weld time, or electrode tips worn flat with poor conductivity.
Our Standard Solution
- Do not boost current all at once. Extend weld time slightly for thin sheets to avoid burn-through.
- Maintain clean copper electrode tips; oxide buildup blocks current flow.
- Keep sheet thickness matched. Never weld 0.6mm sheet directly against 2mm plate without parameter adjustment.
4. Deep Electrode Indentation & Sheet Thinning
What you see
Deep dents on the sheet surface, thin base material around the spot, leading to early cracking under vibration.
Root cause
Excessive pressure paired with high heat crushes the thin sheet while melting the nugget.
Fix
Use wider electrode contact face to spread pressure evenly. Lower clamping force once fusion is achieved.
5. Sheet Distortion After Multiple Spot Welds
What you see
Flat blank bends upward after a row of consecutive spot welds. Uneven thermal contraction creates permanent warpage.
Root cause
Welding all spots in one straight line; heat builds up continuously along the seam.
Zorapid Low-Distortion Sequence
- Use staggered skip welding. Weld one spot, jump 2–3 positions ahead, then fill gaps later.
- Keep the part clamped in fixture until it cools fully to room temperature. Do not release clamps right after welding.
- Add 3–5 seconds cooling interval between each spot to control overall temperature rise.
6. Electrode Sticking to Thin Sheet
The copper tip fuses to the workpiece and tears material when lifting.
Solution: Shorten weld duration, clean electrode surface regularly, and avoid prolonged current flow on ultra-thin stock under 0.6mm.
5 Critical TIG Welding Defects for Thin Sheet Metal & Permanent Fixes
TIG (GTAW) on thin stainless steel, aluminum, and cold-rolled sheet has one main enemy: uncontrolled heat input. Even a 5-amp overshoot blows a clean hole right through the panel.
1. Burn-Through – The Biggest Headache for Thin TIG Work
What you see
Open holes along the weld seam; the molten puddle drops through the sheet with zero penetration control.
Root cause
High continuous amperage, slow travel speed, no heat sinking, and poor fit-up gaps. Thin sheet has almost no mass to absorb arc heat.
Our Zero-Burn Standard Process
- Switch from constant current to high-frequency pulsed TIG. Lower average heat while keeping arc stable. For 0.8mm 304 stainless sheet: Peak 40A, Base 15A, Pulse frequency 50–80Hz.
- Clamp the sheet tightly against a solid copper backing bar. The copper pulls excess heat away instantly.
- Keep a short arc, move the torch faster than you expect. Do not pause to watch the puddle.
- Split long seams into 25mm short stitch welds, alternating sides to spread heat evenly.

2. Heat Warping & Oil-Canning of Thin Panels
Thin sheets expand rapidly when heated, then shrink unevenly and stay bent permanently. Aluminum sheet warps twice as badly as steel due to high thermal expansion.
Anti-Warp Rules We Follow Strictly
- Make dozens of tiny tack welds every 10–15mm to lock joint alignment before running full seams. Large gaps let the seam open and shift as temperature rises.
- Always weld from the center out toward the edges, never end-to-end in one pass.
- Allow each short weld segment to cool fully before continuing the next section.
- Use rigid vacuum fixtures to hold the sheet flat during the entire welding cycle.
3. Oxidation & Blue/Brown Weld Discoloration
Stainless steel turns dark blue or black along the bead; corrosion resistance drops sharply after welding.
Root cause
Insufficient argon shielding, turbulent gas flow, and no post-flow protection while the bead cools. Air contaminates the hot weld metal.
Quick Fix
- Increase gas post-flow to keep shielding active until the bead turns dark.
- Use a larger gas cup to build a stable laminar argon layer. Block workshop air drafts with shielding screens.
- Purge the back side of stainless seams with low-flow argon for critical medical-grade parts.
4. Porosity Pinholes Inside TIG Beads
Tiny gas pockets ruin airtight housings and leak-proof enclosures.
Causes: Dirty base metal, damp filler rod, leaking gas hoses, and long arc length sucking in air.
Prevention Checklist
Clean all oil, oxide, and rust with solvent + stainless steel wire brush
Store filler rods in dry heated cabinets to avoid moisture
Keep arc length as short as possible
Test gas lines for air leaks before starting production runs
5. Tungsten Contamination & Crumbly Weld Bead
Tungsten touches the puddle, breaks off, and creates hard inclusions inside the weld.
Fix: Use sharp lanthanated tungsten electrodes, maintain a tight short arc, and avoid dipping the tip into molten metal. Keep amperage low to prevent tungsten melting.
Zorapid Unified Process – Low-Deformation Welding SOP for Thin Sheets
Copy this workflow to cut defects and warpage by more than 90% on 0.5–2mm sheet stock:
- Preprocessing: Degrease + grind all faying surfaces; control joint gap below 0.05mm
- Fixture setup: Full rigid clamping + copper heat sink backing plate
- Spot welding: Staggered skip sequence, stepped pulsed current, extended cooling hold
- TIG welding: High-frequency pulse current, short stitch welding, center-out travel order
- Post-weld: Keep parts locked in fixtures for natural cooling (no forced cold air quenching)
- Final inspection: Visual check + peel test / penetrant NDT for critical assemblies
- Unoptimized batch: 32% burn-through & warpage scrap rate
- After process upgrade: Scrap rate drops below 2.5% consistently
Real EU Client Project Case
A Belgian medical OEM sent us 0.7mm 316L thin sheet housings.
Their previous workshop kept hitting two major issues: TIG seam burn-through and overall panel warpage up to 0.3mm.
We rebuilt the whole welding process: pulsed TIG parameters, copper heat backing, staggered stitch welding plus full fixture cooling.
Final result: Zero holes, flatness controlled within 0.06mm, full penetration without oxidation discoloration.
The assembly passed pressure leak testing and ran stable mass production for 18 months without rework.
Quick Troubleshooting Cheat Sheet
| Defect | Spot Weld | TIG Weld | Fast Remedy |
|---|---|---|---|
| Burn-through holes | Excessive current | High continuous amps | Switch pulse mode + add copper heat sink |
| Metal spatter & expulsion | Low electrode pressure + high heat | Long arc length | Boost clamping force, lower current, shorten arc |
| Sheet bending & warpage | Consecutive linear spots | Long continuous seams | Skip staggered welding + fixture cooling |
| Pinhole porosity | Dirty sheet surfaces | Poor argon shielding | Full surface cleaning + stable laminar gas flow |
| Weak incomplete fusion | Insufficient weld time | Too fast travel speed | Extend cycle time, slow torch movement slightly |
| Dark blue oxidation | Not applicable | Poor gas post-flow | Extend argon post-flow duration |
Conclusion
Nearly all thin sheet spot and TIG welding failures come down to three things: uncontrolled heat input, poor surface prep, and the wrong welding sequence.
You do not need expensive new welding machines to eliminate burn-through, spatter, and warping.
Optimize your current parameters, add heat sinking, and rearrange your weld order.
At Zorapid, we handle ultra-thin stainless, aluminum, and galvanized sheet metal welding for automotive, medical, and semiconductor clients worldwide. We hold tight dimensional flatness while keeping weld quality up to AWS standards.
If you keep fighting thin-sheet welding defects and high scrap rates, send your 3D drawings and material specs. Our welding engineers will deliver a free optimized parameter & fixture plan for your next batch.
FAQ
Can I weld 0.5mm ultra-thin sheet with regular constant-current TIG?
Not reliably. Constant current delivers steady high heat and almost always blows holes. Pulsed low-average current is mandatory for stock thinner than 0.8mm. We always run high-frequency pulse for ultra-thin panels.
Why do galvanized steel spot welds keep spattering badly?
Zinc coating vaporizes violently during nugget formation. Add a low-energy pre-pulse to let zinc gas escape before the main weld pulse, and fully clean the zinc layer on contact areas.
How long should I keep the part clamped after welding to stop warping?
Leave all fixtures locked until the whole sheet reaches ambient temperature (12–25°C). Releasing clamps while the metal is hot lets residual stress warp the flat blank.
Is copper backing the only way to avoid TIG burn-through?
It is the most reliable low-cost solution. If you cannot use a backing bar, split the seam into tiny stitch welds with long cooling pauses between each short segment.